Translate

Wednesday, August 27, 2014

Blooms and Birds Card


Hello friends! I hope you're having a wonderful day. Here in Charleston the sun is shining and the oppressive heat of last week has gone, leaving us with absolutely beautiful weather. It's such a pleasure to walk outdoors and feel a gentle, warm breeze instead of the inside of an oven. I had a harrowing moment this morning when I had to kill a spider. That's supposed to be my husband's job, but it seems like they always turn up when he's at work...    
Today we begin and brand new challenge at the Frilly and Funky Challenge Blog! Cec is our host and her theme is A Summer Garden. She asks us to create a project depicting any type of garden our heart desires.  It can be landscaping, a flower garden or even a vegetable garden! The challenge winner receives a guest design spot on the blog, and all entrants have the chance to win a $25.00 shopping spree at the Funkie Junkie Boutique!  Be sure to hop over to the blog for the lovely inspiration of my teammates, as well as the challenge entry details! 


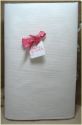
My own summer garden wouldn't be complete without birds. I keep several feeders in the garden just outside my craft room window. I have a wide variety of songbirds that visit throughout the day, and I adore observing their gentle ways and interactions. Last week I had the pleasure of watching the Cardinals and Red Bellied Wood Peckers teaching their fledglings to eat from the feeders. While it seemed extremely frustrating for the parents, it was a close up view of a miracle for me.          


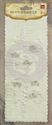
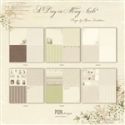
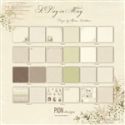
I fussy cut my little bird and nest from Pion's 'A Day in May' design paper. It's my first time using it and I am in love with this paper collection. I plan to stock up on it and hoard it so I'll never run out, so if you want any you're going to have to beat me to it!!  I added a few stray pearls here and there. They were left over from one of my Prima pearl sprays and I didn't want to waste them.     


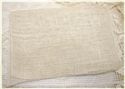
I created a woodsy garden of delicate blooms using flowers from my stash along with some die cut branches and rose leaves.    


The half circle near the top is framed by a lace doily I made using one of the new Prima dies. 


All the papers are distressed and layered up. I added stitching on the bottom layers. I'm getting better at sewing a straight line!   


Thank you so much for being here with me today! May your day be blessed with all things good and wonderful! I hope you'll join in on the challenge with us. You have two weeks to submit your entry, so there's no rush. Just close your eyes, dream of a beautiful garden that is near and dear to your heart and start creating!! 

Hugs,


Friday, August 22, 2014

Burlap Flower Tutorial


Hello and happy Friday to you!! I know I've said this before, but it's my favorite day of the week. I especially loved it when I still had school age children. I was always thrilled to pick them up from school knowing we had an entire weekend to relax and spend time together. Even though my little ones are all grown up I still love the memory of those times and the fun we shared. 
Today is exciting for yet another reason! I'm honored to present a tutorial for these burlap flowers for the Friday Focus at the Frilly and Funkie Challenge Blog. I have a beach themed project in the works and I wanted to create a simple flower with a rustic elegance. Just click on the link above and it will take you to the full tutorial post.     

Here are a few additional photos and close ups of the flowers. 


Thank you for visiting with me today. I wish you many joys as you begin your weekend. I hope you're able to relax and make treasured memories with the people you care about the most! 

Hugs,


Wednesday, August 13, 2014

Attic Treasures ATB


Hello dear friends! How are you doing today? It's a busy time of year for so many. Quite a few of my friends have been taking vacations, and this week I've seen several 'first day of school' photos on Facebook. Hard to believe school is starting back already! I'm always amazed at how quickly summer speeds by. 

It's also time to unveil a brand new challenge at the Frilly and Funkie Challenge Blog! Our host, Jenny, asks us to create a 3D vintage project based on a cube shape. I've used Artist Trading Block die cut cubes from The Funkie Junkie Boutique. To celebrate the challenge Linda is offering an extra 15% discount on this die during the current challenge period, but you're welcome to use your own templates, dies or hand cut cubes. Decorate, embellish, and alter them in any way you choose as long as they are cube shaped and have a vintage feel. For some absolutely amazing inspiration from my teammates and for all other entry details just click on the Frilly and Funkie link above!   

For this challenge we're teaming up with our friends at The Artist's on the Block. They have a dedicated team that focus on Artist Trading Blocks using Eileen Hull Design cubes (along with many other 3D die cut shapes) in incredibly imaginative ways. Their companion challenge blog, Art With Heart, has an 'Anything Goes' theme this month. This gives you the option of entering your creation there as well, where they are offering the chance to win a brand new Eileen Hull Designs die!


This was my first experience creating an ATB, and I admit to being a bit apprehensive. It turned out my fears were unfounded as they are a joy to work with! Now I'm like a kid with a new toy. I'm thinking they may become a new crafty addiction...   


My mind's eye envisioned a young lady's box of treasures, time-worn and tattered, found stashed away in a corner of a dusty attic. In reality there wouldn't be a garden of flowers cascading from the box, but I adore flowers so I created my own reality. I feel like that's one of the most wondrous aspects of art; if you can imagine it you can bring it to life!   

I used two cubes; the largest is 2 1/2 inch square and the small cube is 1 1/2 inch square. I prepped them with gesso and covered them in hand distressed layers of Maja Vintage Summer Basics design paper. The mini ephemera is part of the same paper collection.   


Some of the flowers are handmade and others are from my stash. Each is stained and painted to coordinate with the papers. I also die cut rose leaves from the paper collection. With my embellishments prepped and assembled it was time to start the collage process.  


No proper hope chest would be complete without pearls! I added strands of fused pearls throughout as well as Prima adhesive pearl flourishes to the sides of my cube. I couldn't resist tucking in some frayed cheesecloth.    


It's difficult to discern in the photos but all of my paper layers were stitched together on my sewing machine. 


I hope you'll join in the challenge! If you've never tried an ATB before just take my word for it...you're going to love them!!  

Thank you so much for visiting and sharing in the love of paper crafting with me. Stop by anytime and share your crafty adventures with me! I wish you peace and joy as you go continue through your day! 

Hugs,