Translate

Wednesday, March 26, 2014

Altered Clock: A Secret Garden


Hello to all! I have some fun news today. I'm thrilled to be hosting the Frilly and Funkie challenge for my very first time! The mission is to create a project using clocks and time as your theme. The winner will earn a Guest DT spot at Frilly and Funkie, and everyone who enters will have the chance to win a $25 spending spree at The Funkie Junkie Boutique! Hop on over to visit the Frilly and Funkie Challenge Blog for all the details. 

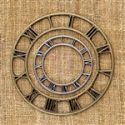
I adore vintage clocks, so I immersed myself in altering one of the Tim Holtz Ideaology Assemblage clocks. In case you have questions about the supplies I used I'll leave a full list at the bottom of this post. I'll start off by giving you a tour of my garden.  


Tread carefully now, for we have entered into an extraordinary place. This hidden garden is sanctuary to many creatures, including a little bird who has chosen it as a refuge in which to nurture her young. If you peek inside you can just make out her tiny home nestled among the foliage and roses. Spend a few moments breathing in the fragrance of the blooms and relishing the feel of the cool, moss covered earth beneath your feet. Perhaps, if we are very still and very silent, we will gain the trust of the inhabitants as this gentle girl has...


I started out by priming my clock and metal embellishment with Gesso and aging them with a self concocted glimmer spray. I was lucky enough to have some natural moss and an actual little bird nest from a previous season to include in my clock, along with several other goodies from Prima and Tim Holtz.


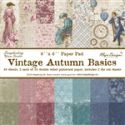
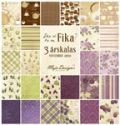
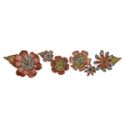
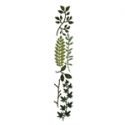
I created quite a few handmade roses, leaves, and vines from gorgeous Maja papers to embellish the interior and exterior of my clock. The sweet vintage girl is a free image from Janet K. Designs. Everything seemed to fall right into place. There are many collage elements inside the clock that are not visible in the pictures. I tried to give you a better view of them but it was super hard to get the photos. 


Thank you so much for stopping by to stroll through my secret garden. I treasure your visit and wish you peace and joy this day and always! 

Hugs,


Other Supplies: Tim Holtz; Paper Stash Wallflower, Alterations Clock, and Ephemera Pack Thrift Shop. Magnolia Rose Leaf die, Impression Obsession branch die, free vintage image by Janet K.  Designs, tiny plastic eggs from stash, real bird nest and natural moss. Sentiment is computer generated.

Friday, March 14, 2014

Shabby Romance: Layered Flower Tutorial


Hello dear friends! The end of the week has arrived, bringing with it the Frilly and Funkie Friday Focus. I'm incredibly excited to be presenting this week because the focus is on one of my favorite products, Maja Design Papers. Remember, this also means Linda will be offering a 15% discount on all Maja papers this week at the Funkie Junkie Boutique. That's enough to have me jumping for joy!   
I thought long and hard about how I could introduce these papers to those of you who might not be familiar with them. I decided on a tutorial for these layered paper flowers. I make these often because of their simplicity and romantic, shabby appeal. I also enjoy the freedom of choosing colors and patterns to coordinate specifically with my project. 

I made two sets of flowers. One showcases Vintage Autumn Basics, the other Vintage Summer Basics. This way you can compare the two lines and their amazing scope of color and designs.    


The above flowers were created with Vintage Autumn Basics. The flowers below were made with Vintage Summer Basics.  


The first step is to die cut or punch 6 five petal flowers. I used a Spellbinders die because the size was right for my project, but you can use anything you like. Cut 1 large petal, 3 medium petals, and two small petals.    


The next step is to lightly moisten your small petals with water. Shape one of them as pictured below to for the base of your center bud. The second small petal should just be squished together. It is going to become the center of the bud. For petal shaping I use a tool kit and shaping mat from Susan's Garden. You can find similar tools and mats in other brands. You can even use a mouse pad!


Now that your bud is shaped it's time to to move on to your larger petals. Moisten them all lightly with water then gently scrunch and twist them into something that resembles the photo below. It seems like this would tear them apart, but it doesn't. Maja papers are strong.     


After you have scrunched and twisted you very gently un-scrunch and un-twist them. This is where you want to be quite careful. They will be all crumpled and twisty. That's good. Leave them that way, place them on a baking sheet and put them in the oven at 225 degrees Fahrenheit for a few minutes to dry them out. Just a few minutes is all it takes, and remember not to walk away from your oven while baking paper. The photo below is of the baked petals. You may be tempted to skip the baking, but it really cements the shape of the crinkled petal and adds even more dimension and texture.     


The next step is to take the two small petals and glue them together to form your center bud. You can work with the middle petal, put some glue in the center and scrunch it into a bud like shape before adhering it inside the small outer petal. 


Now adhere the 3 medium petals together, staggering the petals and alternating the patterned side with the solid side as demonstrated below.   


At this point you are ready to glue in your center bud. It will appear similar to the photo below: 


The final step is to adhere the large petal to the bottom. Voila! You now have a finished bloom in colors that will match your project perfectly!  


Since my flowers are going out as a gift to a special friend, I added a finishing touch in the way of packaging. I used a couple of the crystal clear A7 card boxes, put a resealable glue dot on the bottom of each flower and adhered them to a coordinating piece of Maja design paper. 


Thank you so much for stopping in today and checking out the Friday Focus. It has been a pleasure to share my love of these papers with you. I hope this day brings you joy and lots of crafty inspiration! 
Hugs,

Wednesday, March 12, 2014

From the Flower Market


A happy hello to my amazing blog friends! It is such an honor to have you visit. I hope this day finds you well and doing everything that brings you joy. I'm super excited because our son will be home for spring break in a few days. We haven't seen him since he went back to college in early January. He stays so busy that he can't come home unless there's a break, so I cherish every moment I have with him.

Another 2 weeks have flown by and it's time for another fun challenge at the Frilly and Funkie Blog! Rebecca is our host, and she challenges us to select a neglected die from our stash and see what we can create with it, thinking outside the box...or in it!! 


This was the perfect challenge for me. I get set in my ways and tend to pick up the same dies over and over, letting others sit on a shelf collecting dust. Well, I blew off that dust and chose 5 dies I purchased months ago but have never used, as well as a couple of stamp sets. I'll include a supply list at the bottom of my post in case you're interested. 

The coming of spring has me longing for the Farmers Market with its bounty of fresh produce and blooms. I went with that theme to create this vintage inspired flower cart, overflowing with roses in all shades of purple and lavender.    


My first challenge was to create the wheelbarrow using a Sizzix Die. I covered it in Tim Holtz Picket Fence crackle paint, then wiped on vintage photo distress stain to give it an aged appearance. I also did a little stamping on the sides using Distress Ink.

Next on the list came the roses, and lots of them. I used a Tim Holtz die and Maja Papers to create these tiny beauties. It was time consuming work, but well worth it in the end. Once I had the flowers arranged to my liking I filled in the base with natural moss.


I used another die and stamp set from my stash to craft the little 'sale' sign. A few delicate butterflies have fluttered around my flower cart as a finishing touch. 
   

I thank you for stopping by to take a peek at my little wheelbarrow. I send my wishes to you for a day filled with happiness and all things wonderful! 


Additional Supplies: Stamps: Crafty Secrets Price Tags, Stampendous Eiffel Tower Clear Set; Dies: Sizzix Wheelbarrow, Cheery Lynn Small Exotic Butterflies and Build a Flower 2, Magnolia Peaky Flower Tab; Natural Moss and Floral Wire from my stash.