Translate

Monday, December 10, 2012

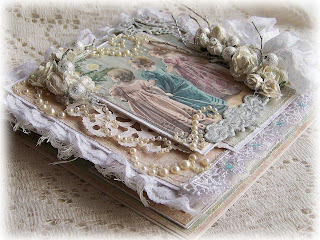
Christmas Easel Card and Stick Pin Set


Hello!  Thank you so much for stopping by on this lovely day! I hope you're enjoying a wonderful holiday season. It's my favorite time of the year!  We've been busy decking our halls and filling our home with the sites of Christmas. My next order of business is to fill it with the heavenly aromas of the season, in the form of a few scrumptious, home baked goodies. Before I get started baking, I want to take a moment to share a project I recently finished. 

I'm beyond excited to be a guest designer at the Shabby Tea Room! The challenge for this week is to craft a project using pink, aqua, silver, and glitter ~ my favorite colors and elements! 

The inspiration photo:


I created this easel card and stick pin set using a vintage postcard as my focal point. The look of wonderment on the little girls faces as they gaze up at the candlelit tree is such a sweet reflection of the magic and joy of the season!  I added layer upon layer of shabby goodness, matting each card stock layer and stitching them together on my sewing machine to give my card a warm and cozy feel. 


I made the stick pins using jewelry findings from my stash.  


The base of the easel box is made of chipboard to add strength.


I created the floral sprays with paper flowers, silver beads, and twigs that I painted white and coated in iridescent and silver glitter. The flowers, metal elements, and bow are painted and glittered in the same technique to add tons of sparkle!


I made this set as a Christmas gift for my dear friend, Su. I'm hoping that by the time this post is live, her package will already be making it's way across the ocean to France! 

The dimensions and plans to create the base for the easel stick pin card can be found at the amazing Luvleescrappin on Youtube! Thank you again for visiting today. I'll be back soon to share some of my favorite homemade holiday treats. My heartfelt wishes to you for a blessed and magical Christmas!  Hugs, 

Sunday, November 4, 2012

Moist and Spicy Pumpkin Bread


Hello! I hope you're having a wonderful day! We're having a very blessed weekend here. We borrowed our grandchildren from their parents on Friday evening and took them to see Wreck it Ralph. Our 3 year old grandson was so enthralled that he didn't try to wander from his seat even once. I can tell you that very rarely happens! We had the best time with them. I made them treat bags (and snuck them in!) It was so much fun to look over at their dear faces as they enjoyed the movie and munched on their candy and kid cartons of popcorn. I love my family so much!  

With the harvest season fully upon us the air is crisper and the evenings have a bit of a chill, even here in Charleston. I'm drawn to my kitchen more than ever this time of year, and I find myself craving everything to do with pumpkin.

Yesterday I baked up my favorite pumpkin bread, finding joy in each moment of the preparation. There's something about this bread that warms the heart as well as the soul, filling your home with the most heavenly aromas of the season as it bakes. The recipe turns out two large moist, spicy loaves, every bite filled with rich pumpkin flavor. I cut them in half, wrap them securely, and pop the extras in the freezer. Now I can produce a scrumptious treat at a moments notice! This is one of my go-to home baked goodies to add to my gift baskets during the Christmas season. 

If you'd like to add this to your own holiday table I've shared the recipe below. Thank you so much for stopping by today! You have made my day more special with your visit! Hugs,      


Pumpkin Bread

Ingredients:
3 cups Flour
1 tsp. Salt
2 tsp. Baking Soda
2 tsp. Baking Powder
2 tsp. Cinnamon
½ tsp. Ground Ginger
½ tsp. Ground Cloves
2 cups mashed pumpkin
1 cup Oil
½ cup Butter at room temperature
2 cups Sugar
4 Eggs, beaten

Directions:
Preheat oven to 350
Grease 2 9x5 loaf pans
Sift dry ingredients together in a bowl. Combine oil and sugar in another bowl. Add pumpkin and eggs and mix well. Add dry ingredients to pumpkin mixture until just blended.  Pour into 2 greased 9x5 loaf pans. Bake at 350 for about 50-55 minutes.  


Friday, October 26, 2012

Moist and Chewy Snickerdoodle Blondies!


Hello and thanks for stopping by! At last...Friday has rolled around again; my favorite day of the week! I have always loved the anticipation of the upcoming weekend. An evening and two entire days devoted to family, fun, and relaxation. We can kick back and routines can slide, even time seems to slow down just a bit.   
My son called from college today declaring, "I want cookies. Katie's mom sent cookies. You haven't sent me any cookies lately." It may have been a bit on the demanding side, but my heart melted. My sweet boy still craves a little homemade goodness even though he's grown up and far away.
That was all the motivation I needed to whip him up a batch of chewy and oh-so-buttery snickerdoodle blondies. I took the photo above of my blondies fresh out of the oven.  Click on the photo to enlarge it; then imagine yourself biting into one of these dense, moist, cinnamon-sugary, melt in your mouth bars. Yes, they are amazing! You'll find they are easy to prepare and they travel well, making them perfect for gift giving, pot-lucks, after school snacks, or hungry sons at college. I pinned this recipe to my Pinterest board from a wonderful desert blog called Dozen Flours. I altered the baking time a little because I found (through trial and error) that baking them for 30 minutes dried them out. Mine come out perfectly after only 20 minutes.  
Shhh....don't tell my son, but I just had to keep a few for my husband and myself:-) Thanks again for visiting with me today and happy baking! 
Snickerdoodle Blondies


Ingredients:
2  2/3 cup all purpose flour
2 tsp baking powder
1 tsp kosher salt
2 cups packed brown sugar
1 cup butter at room temperature
2 eggs (room temperature)
1 Tbsp vanilla extract
2 Tbsp white sugar
2 tsp cinnamon

Preheat oven to 350F. Lightly grease a 9 x 13 inch pan.

Sift together flour, baking powder and salt and set aside. In large bowl, beat together butter, sugar, egg and vanilla until smooth.


Stir in the flour mixture until well blended. Spread evenly in prepared pan.  Combine white sugar and cinnamon in a small bowl. Evenly sprinkle cinnamon sugar mixture over the top of the batter.


Bake 25-30 minutes or until surface springs back when gently pressed. Cool slightly. While still warm, cut into bars with a sharp knife.


Monday, October 22, 2012

Apple Streusel Coffee Cake


Hi! I hope it's been a great Monday for everyone! I was blessed to spend a joyful day of lunch and shopping with my daughter, grand-girl, and one of my very best friends. Time with the people I love is so precious to me. It was the perfect way to spend a Monday. 

Once I was back home I was hit by the baking bug, so I preheated my oven and pulled out this recipe that's been in my family for ages. I made this Apple Streusel Coffee Cake often while in college. I was in nursing school and we took turns bringing tasty treats on the days we had clinical. Over the years it's become one of my go-to recipes for gift giving and pot-lucks. This scrumptious cake is irresistibly moist. It's layered with apples, streusel, and finished with a sweet glaze. With the bounty of apples this time of year it's the perfect way to celebrate the harvest season. When I have time I make my own apple filling, but when you're in a rush the canned filling is a real time saver. I hope you'll enjoy this cake as much as we do!   

Oh! I have some happy news to share as well! My secret garden card was chosen as the winner of this weeks challenge at the Shabby Tea Room.  I am so very honored! What a perfect ending to a lovely day. 

Thank you so much for spending some time here at my blog! I hope your day is filled with happiness, laughter and a wee bit of magic (my Irish soul insisted I add that last bit:-) Hugs,   
Apple Streusel Coffee Cake 

(click here for printable recipe)
  
Ingredients:
1 20 oz can Apple Pie Filling (or see directions below for homemade filling) 
2 tsp. Cinnamon
1 cup packed Brown Sugar
1 cup chopped Nuts (Pecans or Walnuts)
3 cups Flour
1 cup Sugar
1 ½ cup Milk
½ cup Butter, softened
3 tsp. Baking Powder
1 tsp. Salt
3 Eggs
3 Tbsp. Butter, melted

Directions:
Preheat oven to 350
Grease a 13 X 9 pan
Combine Pie Filling & Cinnamon – set aside. Combine Brown Sugar and Nuts – set aside. In large bowl combine Flour, Sugar, Milk, ½ cup Butter, Baking Powder, Salt, & Eggs. Mix on low 30 seconds beat on medium 2 minutes. Pour ½ Batter into prepared pan. Spoon ½ Pie Filling evenly over batter. Spread ½ Brown Sugar mixture evenly over pie filling. Add remaining Batter to pan and spread remaining Pie Filling over top. Mix 3 Tbsp. melted Butter with remaining Brown Sugar mixture. Spread evenly over top of cake.
Bake 45-50 minutes until tester comes out clean.     

Glaze
1 ½ cup Powdered Sugar
2 Tbsp. Butter
1 ½ tsp. Vanilla
4-5 tsp. hot Water

Combine all ingredients until smooth. Drizzle over cake 20 minutes out of oven.


* For homemade apple filling: Place 4-5 peeled, cored, and sliced cooking apples, ½ cup brown sugar, ½ stick butter, 1tsp. cinnamon, and ¼ ~½ tsp. salt in a sauce pan over low to medium heat.  Heat until apples are slightly softened.  You use this instead of the canned pie filling/cinnamon mixture. The measurements for this are approximate as there were no actual measurements to begin with and it depends a lot on the size/type of your apples. The amount of sugar can be changed depending on the tartness of your apples. 

Sunday, October 21, 2012

Rustic Elegance Secret Garden Card


Hi and happy Sunday! I have a little project to share today. I created this card for the Shabby Tea Room weekly challenge. The theme this week is rustic elegance. My Irish soul (whose advice I always take!) inspired me to take a journey inside a secluded garden. It is usually locked tight, but today the fairies have left us the key to the garden gate! We've arrived at the perfect moment, for we are just in time to glimpse some woodland nymphs as they watch over a spring nest.  I used soft hues of vintage pink, mint, and cream. The beautiful image I used as the base of my card was found on Pinterest, and is the amazing work of Astrid Maclean. I've included some additional detail photos below. I thank you for taking time to stop by my blog! You have made my day more special by visiting. May your day be filled with with everything wonderful! Hugs,

This was the photo inspiration for the week. The challenge was to use the colors from the photo as well as a rustic and elegant element. 


Sunday, October 7, 2012

Altered Shabby Chic Frame with Handcrafted Butterflies and Floral Sprays


Hi! I hope everyone is getting a chance to enjoy this lovely weekend! I love weekends and generally fill them with excitement and activity, but I'm currently under the weather so I decided to spend this one doing nothing but resting and drinking hot tea. I've slept in each morning and taken afternoon naps in my cozy library chair. I've spent some time online feeding my Pinterest addiction. I  finished an amazing book and started another. I even finished season one of Larkrise to Candleford (thank you Su!! I love this series as much as Downton Abbey!) I also found a moment to get some photos of my latest project, an altered frame I've been working on for my friend. Sadly, her beloved dog (Brandi) passed away. Her husband had an especially close bond with Brandi. My friend wrote this letter (to him from Brandi) and asked if I could print it for her. She's one of my very best friends so I wanted to create a special keepsake for her. It took me a bit of time to finish it, but I hope she'll find it worth the wait.   

   
I started with a plain white frame and did some distressing and inking to age it up.

I aged a couple of selections of lace from my craft supply and adhered them to the inner an outer edge of the frame.

I'm in love with adding dimension to my projects. For this frame I aged several layers of white card stock. My aging technique includes tea stain, distress inks, a sanding block, and some 'artistic tearing.' After that was complete I started layering away until I had the look I wanted. 

                                      
I found this adorable little paw print stamp on eBay and just had to have it. 

My next step was to get to work crafting floral sprays for the corners. I love creating flower sprays! There is no right or wrong way to make them and each one is a little different. 


I attached a couple of charms to the flower spray in the right corner of the frame. I  love everything related to timepieces . I thought these were perfect. 


I still felt like it needed a little something more to bring it to life, and thought, 'what could be more perfect than butterflies!' I made these using heavy gold card stock, my favorite Cuttlebug cutting and embossing set, and rub-n-buff in autumn gold to match the detailing I used on the flower sprays. 


My Irish soul made an appearance again, rather insistent that some magical sparkle was needed. I like her (and she's almost always right!) so I pulled out my bottle of fairy dust and applied liberally.  


Here's a close up of the aging and layering of the card stock.


This is the sweet letter my friend wrote. Such a touching farewell from Brandi to her husband.  I cried when I read it.

Thank you dear friends for taking a moment to check out my project! It is a joy to be able to share it with you. I wish you a lovely day filled with happiness (and maybe just a touch of magic!)

 Hugs,